PISC – Conditional Jumps

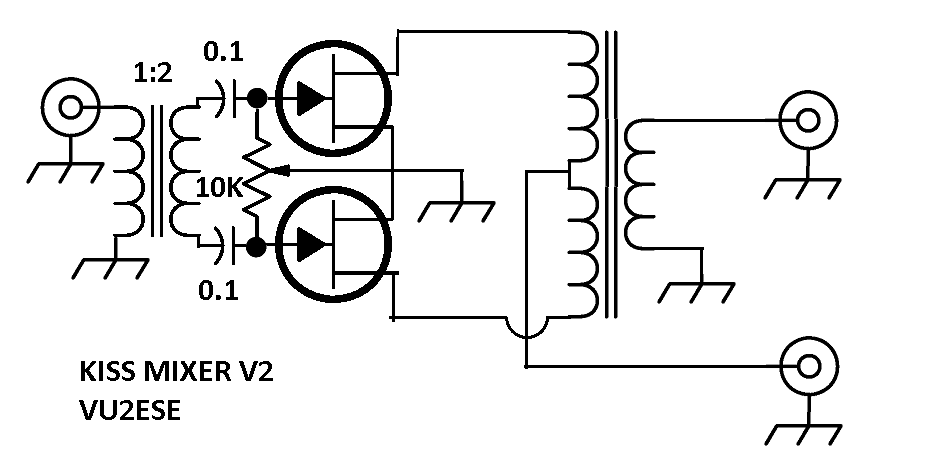
The first of the “Glaring Deficiencies” in need of a solution was the missing conditional branch (jump). This is how I went about solving it. Firstly a review of how PISC encodes an instruction:-

                              IR 15:0
MRD  MWR ARGx3 DRGx3 LTS/ CY-IN ALUx5
   1        0      111     xxx      1        11   0-0000       

A sixteen bit instruction where:-

MRD   = Memory/IO Read

MWR   = Memory/IO Write

ARG   = Address Bus Register Select x 3 bits (ALU A Input)

DRG   = Data Bus Register Select x 3 bits (ALU B Input)

LTS/  = Latch Status (Both CY & EQ) when low

CY-IN = Carry In Signal Select x 2 bits

ALU   = ALU Function x 5 bits

The actual values above are taken from Brad’s original paper and are in fact the hard coded Fetch Instruction. The data bus register select is shown as “xxx” for “don’t care” because during the Fetch Cycle the normal write to Register File (port C-in) is inhibited and the data bus contents are instead latched into the “Instruction Register”. If one looks to the actual circuit diagram for PISC 1.0a we can see that this register select happens to be wired all high (R7). So the actual Fetch Instruction is:-

10111111 11100000 or $BFE0

This instruction translates to:-

  1. Read memory (destination is the Instruction Latch during fetch cycle).
  2. Address Register set to R7 (the Program Counter).
  3. Do NOT latch the status bits (high)
  4. CY-IN Select = ’11’ which is a numerical one “1” indicated by a logic low.
  5. The five 74181 ALU Function Bits correspond to “Arithmetic Operation F=A+CY

So the result is that the register R7 the Program Counter is used as the address to read and is then post incremented because the CY-IN is hard selected for a “1”.

Probably also worth showing the Carry-In select truth table for the original PISC 1.0a at this point:-

00 = CY
01 = EQ
10 = "0" (logic level high)
11 = "1" (logic level low)

Now that all this is behind us let’s get down to the details of the modification. From Brad’s original paper he observes that the 74181 can be selected for either a Logic or Arithmetic operation. This is controlled by IR:4 which I separated out above as the leading “0-” in the fetch instruction to make it stand out.

Brad goes on to make the important observation that if IR:4 is set high for a logic operation then the CY-IN selection bits IR:6 and IR:5 are irrelevant because the Carry-In is not used for logic operations. So this is where we shall implement our conditional branch.

We are going to arrange it such that “if a carry-in *is* specified for a logic operation” which notionally makes no sense because why would you bother if it is going to be ignored. Then this will trigger the process of a conditional operation which uses the “truth” of the the CY-IN as a signal which will either inhibit or allow the write back to the Register File from the ALU output.

But for this to all work nicely we first need to re-order the selection table for the CY-IN select. So in my PISC 1.0c version this select table looks like this (obviously at this point any code Brad wrote for his 1.0a version is not going to run on mine ;-).

00 = "1" (logic level low)
01 = CY
10 = EQ
11 = "0" (logic level high)

Also note that this change plays with the order of the “0” and “1” as well. Which means that we must change the hard coded Fetch Instruction such that it is now:

10111111 10000000 or $BF80

The re-ordering of the “1” and “0” gives us some very important additional functionality which I’ll get to shortly. But was not strictly required for conditional jumps.

So this now gives us a instruction table subset for bits IR:6, IR:5 and IR:4 that looks like this:

00-1 = Valid Logic Function write to Register File enabled WEA/ = Low
01-1 = Conditional Write to Register File dependent on CY status bit
10-1 = Conditional Write to Register File dependant on EQ status bit
11-1 = Write back to Register File is forcibly inhibited WEA/ = High

The last combination in the table “11-1” is the reason for swapping the order of the “0” and “1” around. This arrangement enables us to programmatically stop PISC from writing the result of an ALU Logic Operation back to the A-Register. When would you wish to do this? When you are performing a logic operation and you are only interested in setting the Flags (EQ & CY). But *do not* wish to destroy the contents of your A-Register while doing so.

Normally PISC 1.0a will always write the result of the ALU logic function back into the register specified for the Address Bus or ALU “A” input (same thing). There is no way of stopping this. Now there is, so a instruction like this:

CMP   R0,R4

Which is “Compare registers R0 and R4 and set the EQ flag if equal”. Can be crafted such that the contents of register R0 is not overwritten by the operation. Quite a useful feature! Sadly this only works for ALU Logic operations and not for Arithmetic operations. Oh well, I’ll take those features I can get cheaply.

So what do the actual PISC Assembler instructions look like? We can now craft an instruction like this:

MOV   R7,R4    IF EQ

Translated: Copy the contents of R4 to R7 (R7 being the Program Counter) but only if the EQ flag is set “1” (logic level low). If the copy is successful then a jump to the location in R4 happens. If the copy is inhibited then the next instruction is executed. Conditional branch.

Of course my PISC Assembler allows you to normally code this instruction as something like:

JEQ    LOOP

Jump if Equal to address LOOP.

So how expensive is the modification? Three gates (besides the re-wiring mentioned above). Looks like this:

PISC – Glaring Deficiencies

In the source article for my PISC project “A Minimal TTL Processor for Architecture Exploration”, by Bradford J. Rodriguez. Brad wrote the following:

Glaring Deficiencies

Many weaknesses of the PISC become evident after a short period of use, including:

a) no conditional branch microinstruction — an important need [6];
b) no provision for literal values in the microinstruction;
c) no ALU logic for multiply, divide, and right shift;
d) no logic for decoding of macroinstructions;
e) no provision for interrupts;
f) sparse coding of the ALU function select; and
g) two clocks required per microinstruction.

I have been successful in correcting a good number number of these “deficiencies” . In many cases by using Brad’s suggestion for a solution from the original article. So as a starting point towards documenting the changes I made between the original PISC 1.0a circuit and my PISC 1.0c derivative I’ll outline which of these have been solved and those that remain as “Glaring“. I’ll also provide some of my thoughts on the need for each of these features.

Glaring Deficiency “A” – No conditional branch micro-instruction. := SOLVED

Yeah, this is a biggie. Although I’ll quickly point out I have discovered that it is not totally impossible to write a useful program without such an instruction. Turns out that some very early computers built just after WWII didn’t have such an instruction either. So the early pioneers of computing programming resorted to self-modifying code. Where the program would overwrite the jump address in store. Just the thought of coding like that makes my head hurt!

So I provided some circuitry that would inhibit the write back of the ALU output to the Register File dependent on the state of the selected flag (EQ or CY). This essentially sets up the conditions required for an instruction like this:-

MOV      R7, $0200     IF CY

Which translated: copies address $0200 to Register R7, which is used as the Program Counter (PC) but only if the CY flag is set. If the CY flag is not set then the move operation (really a copy) is inhibited. Conditional jump.

The solution is here.

Glaring Deficiency “B” – No provision for literal values in the micro-instruction := REMAINS (do we care?)

I started off thinking that this was pretty important issue. Also that it should be pretty easy to solve. After spending a lot of time considering various ways to add this functionality. I eventually came to the conclusion that there was probably isn’t much point.

Any circuit that I could dream up was overly expensive in terms of complexity and chip count. And I had already added one too many IC’s to Brad’s otherwise elegant design. But the real kicker was that I could not find a way to sensibly do this in a single execute cycle. It would need at least two.

Now here’s the thing. PISC v1.0a stock standard can already load a 16 bit literal value into a register in a single execute cycle. The only thing dubious about this is that it needs an entire word in memory to store the literal following the actual load instruction. Granted most of the literals programmers use are apparently quite small. So it would be a more efficient use of available memory if we could load-up say 8 bits (0-255) of data alongside an 8 bit instruction for a one word opcode. But memory in my PISC really isn’t in short supply (128K ROM, 128K RAM in 16 bit words). So the hardware complexity required to add the feature just didn’t seem worth the effort.

Since making this decision I’ve done a fair bit of coding and the kept a concerned eye on the resulting object code sizes. Yep, they are most likely larger than the same project done in Z80 or 6502 Assembler. But not orders of magnitude larger. So I stopped worrying about it.

Later I started coding in PL/0+ which generates byte-code. Which should probably be called Word-code in the context of PISC. Since my PL/0+ word-code is being interpreted by a virtual machine this allows me to encode small literals into a single word along with an instruction. The code density of the PL/0+ object files is very high. The trade off being a reduction in execution speed for an increase in code density. Problem, if there ever was one, solved.

Glaring Deficiency “C” – No ALU logic for multiply, divide, and right shift := SOLVED (Partially)

I have added a simple Shift Register board in the data path between A-Bus and the “A” input to the ALU. This is just a small bunch of 74ALS245 buffers switched around to create one of four possible outcomes:

  1. Data path normal
  2. Data is Logical Shifted Right one bit
  3. Data Arithmetic Shifted Right (a variant of case 2 requiring no additional buffers).
  4. High Byte for Low Byte swap.

So I have solved the issue of the missing right shift. The high for low byte swap in one cycle makes coding for those pesky ASCII bytes so much easier. And is the only hardware nod my PISC gives to byte sized chunks of data.

As for the missing Multiply and Divide instructions? Well I seem to remember that the Z80 and 6502 didn’t have any either. In fact I don’t think Intel gave us this until the 8086! So I just coded my own routines 🙂

Shift Register Circuit coming soon…

Glaring Deficiency “D” – No logic for decoding of macro-instructions := REMAINS (at the hardware level)

Yes, PISC has no micro-code and no micro-code sequencer. This keeps the hardware solution so miraculously, elegantly simple. So for those instructions where it would be really nice to have a “macro-instruction” I just coded this into the Assembler. So the assembler now offloads the complexity of sequencing several instructions together.

Turns out there aren’t that many instructions where I needed to do this. CALL, RET, PUSH and POP come to mind quickly but after that I’m struggling to think of another example. To give a quick illustration of  what I’m talking about. If I was to code:

RET

My PISC Assembler would generate something like:

00A3: ACEF 328: RET { rdd r5,r4 }
00A4: 2080 + inc r4
00A5: 349A + jmp r4

The three instructions required for a Return instruction.

  1. Read with post decrement the R5 stack pointer address contents into R4.
    (Stack grows upwards in PISC)
  2. Increment R4 so that it points to the location just after the original CALL instruction.
  3. Jump to the Address held in R4.

Of course all this would normally take place inside the CPU. But it would be a similar process in silicon and would likely take a similar number of cycles. In fact when I quickly checked the number of clock cycles required by my CALL and RET instructions, they seemed more or less on par with a 6502 and significantly better than a Z80. By way of quick example here are the number of clock cycles required for the return instruction for each of these three architectures:

Arch.  Mnemonic   Cycles

PISC   RET            6      (includes the Fetch cycles)
Z80    RET            10
6502  RTS            6

(The Z80 likely needs more cycles as internally it only has a 4 bit ALU).

Of course we have once again traded hardware simplicity for increased code size. But writing the Assembler source code it is no more difficult and the resulting object code in terms of clock cycles is just as fast (or faster).

Bottom line? So long as one has sufficient memory it would seem that not having the microcode baked into silicon is not such a bad thing and it sure makes it easy to change macro-instruction definitions.

Glaring Deficiency “E” – No provision for interrupts := SOLVED

Solved by implementation of one of Brad’s own suggestions in the original article. Additional hardware allows the I/O cards in the 8 bit expansion bus to raise a single shared interrupt. On detection of the Interrupt the machine switches from using R7 as the Program Counter to R6.

This means that R6 has to be pre-loaded with the memory address of the Interrupt Service Routine before interrupts are enabled. Once the ISR (Interrupt Service Routine) has run it’s course you need R6 positioned back again at the start of the ISR ready for the next cycle. Then on completion we switch back to using R7 again. Interrupt priority is supported by the slot number the card is installed in.

Sounds simple? It wasn’t! In fact this was the hardest part of the entire project. At several dark moments I almost gave up in despair of ever getting it working. After all, my Monitor program was working just fine without darn Interrupts. Does a single user, non multitasking machine really need this?

It was quite challenge working out how to save the CPU flags. Everything, both  hardware and software needed to be spot on before it would ‘fly’.  I spent much time debugging hardware when in fact the particular problem I was chasing was a software bug. We got there in the end and I don’t regret the time spent. It really is quite nice to press Ctrl-C and have the machine jump back into the BIOS (without having to poll the keyboard). The things we take for granted when using PC’s!

Glaring Deficiency “E” – Sparse coding of the ALU function := SOLVED (sort of)

I took Brad’s own suggestion of adding a single 74138 that provides eight supplementary control signals. I use the 3 bits in the control word that normally set the D-Reg (Data Bus Register) value as the selection input to the 74138. I inhibit both memory and register file read/write operations for this special “Control” function cycle.

I encode this “Control” function into the instruction by setting both MRD (Memory Read) and MWR (Memory Write) at the same time. Which would normally be quite illogical (if not damaging).

So I have not changed the actual ALU encoding as such. But I have managed to squeeze in 8 additional functions and they are:-

  1. Logical Shift Right
  2. Swap high byte for low byte
  3. Invert the Flags on the next cycle
  4. Memory Banking
  5. IRQ Enable/Disable
  6. IRQ Clear
  7. Arithmetic Shift Right
  8. Halt

Glaring Deficiency “G” – Two clocks required per micro-instruction := REMAINS

PISC runs two cycles. Fetch and Execute. In the Fetch clock cycle a fixed hardware encoded instruction is executed which loads the next program instruction from memory into a special Instruction Register. On the next clock cycle, the Execute cycle the instruction held in the Instruction Register is executed.

So 50% of the time PISC is not executing your program code but a fetch instruction to get your next program instruction. Not very efficient 🙁  But it sure is simple! 🙂

And besides, no machine of mine is going to have this “delayed branch” NOP instruction nonsense littered all throughout otherwise perfectly clean and logical code 😉 :lol

PISC – Addendum and Erratum

My original memory I/O board PISC 1.0a


During the build process of my PISC I did discover a few issues with the original circuit diagram as found here: https://bradrodriguez.com/papers/pisc.pdf

I’ll now document these discoveries.

One should perhaps mention (again) that this is largely of academic interest only. As duplication of this project would require two key Integrated Circuits. Namely 4 x 74181 ALUs and 8 x 74172 Register file chips. Sadly both of which are now so long out of production that they are nearly impossible to source.

But for the sake of completeness…


1. The 74LS541 being used as the 8 bit Parallel input port as shown on the Memory board (page three) is depicted in reverse. The data output pins (Y1-Y8) from the ‘541 chip should face inwards. Connected to internal data bus and not outwards as shown.


2. On page one of the circuit diagram set. The “ALU” circuit shows the “A=B” pull-up resistor to VCC (designated only as R?) as being 10K ohms. In practice I found that this value worked properly while clocking the circuit with a test signal in the sub Kilo-Hertz range. But as soon as the clock was lifted to 5 MHz the “A=B” signal could not be latched reliably. Reducing this resistor to 4.7K ohms solved the problem. This issue could be build specific of course.


3. The legacy 2651 IC used for the serial port, the “Programmable Communications Interface” is just not fast enough. At least when the system is clocked at 5 Mhz it isn’t. At 5 MHz we have a clock period of 200ns. My 2651 datasheet shows that after the 2651 CE/ pin is asserted the “Data Delay Time for Read (tDD)” is to be 250ns worst case. So we would be somewhat “over-clocking” the 2651 even if we had the entire 200ns.

We don’t. The SIO/ select line to the 2651 CE/ pin is gated via a 74F139 using the CLK signal. This means that SIO/ is only active for the second half of the clock cycle or 100ns in other words. The 2651 cannot operate successfully inside this 100ns window.

So just how fast can the 2651 actually run?

By replacing the master crystal with a pulse generator I was able to determine experimentally that my particular 2651 sample would run to about 2.89 MHz before it started dropping characters. This equates to a clock period of 346.02ns or a 2651 CE/ pulse width of about 173ns. So while still “over-clocking” according to the datasheet it looks like we could get away with 200ns. So my short term fix was to simply halve the clock speed. Changing the master crystal from 10 MHz to 5 MHz resulted in a 2.5 MHz system clock with a 400ns period. Half of which was 200ns which kept the 2651 entirely happy.

My PISC ran this way for well over a year, rock solid, never missing a beat. More recently I created a Wait State board which inserts a single wait state when accessing I/O devices in the 8 bit expansion bus. This allowed me to try running at Brad’s original  5 MHz design specification. At 5 Mhz it gives a good illusion of running. But every so often I’ll get a ‘glitch’ which hangs the machine. So in the interim I have de-rated the system to run at 4 MHz minus any wait states during I/O. At 4 MHz it is once again reliable.

4. While still on the subject of serial ports and the 2651. There is a conceptual problem with the way the 2651 serial port has been interfaced. In the original PISC 1.0a schematic, the deliberately simplified device selection scheme has the 2651 chip enable signal CE/ active whenever address lines A15 and A14 were set low and high respectively. This means that the serial port will respond to any address in an entire 16K block from $4000 to $7FFF. This in itself this is not the issue.

The problem is that PISC uses the Address Bus, otherwise known as the A-Register Bus not only for memory addressing but also for all internal ALU computations. So any ALU operation that just happens to accidentally set the A-Register bits B15 low and B14 high will trigger the CE/ line of the 2651. Now you might expect this to result in a bus contention clash. It does not. The PISC Memory I/O board is tri-state buffered with two 74ALS245’s. Data from the Memory I/O board is only routed to the internal system bus when MRD/ is asserted. Something that does not happen during an ALU operation. So there are no bus contention issue. But the 2651 is still activated for a Read operation.

Why?

The 2651 is controlled by a chip enable CE/ and a single RD/ WR control pin. The 2651 chip has no separate control signals for Read and Write. It is a single pin acting as a toggle. The circuit shows this pin connected to the MWR signal (high on write). So this arrangement effectively places the 2651 in Read mode by default. All this added together results in the 2651 dropping any character stored in its single character receive buffer each time an ALU operation happens to set A-Reg B15 low and B14 high.

This character is placed on the Memory I/O cards local data bus by the 2651 and then simply ‘lost’. A most unfortunate state of affairs that somewhat hampers software development of file transfer protocols 🙂

The solution to this conundrum?

It was fairly trivial to re-arrange the circuit so that the CE/ signal to the 2651 is only enabled when the PISC is truly doing either a Read MRD/ or Write MWR/ operation and this is exactly what I did.

PISC – A Minimal TTL Processor for Architecture Exploration.

PISC – Pathetic Instruction Set Computer

Some time back now (nearly two years if recollection serves) I was web surfing for information regarding that most arcane of computer programming languages “Forth”. As so often happens when Surfing, I stumbled across something only loosely related but of particular interest – to me at least.

A paper by Bradford J. Rodriguez entitled “A Minimal TTL Processor for Architecture Exploration”. This was a design for a complete computer. Albeit with limited capabilities, built from approximately 20 odd TTL chips – but with NO conventional microprocessor or CPU. The TTL chips themselves serve to create the actual CPU.

Having built several home brew kit computers mostly with Zilog Z80 CPU’s. This paper fascinated me. The target audience were clearly intended to be educators in the Computer Science. But while the paper was very concise it was accompanied with a set of three beautifully presented circuit diagrams. So I read and re-read the paper while studying the circuits and eventually the whole picture started to make sense. I thought that I could probably build this.

Small problem. Two primary key ingredients in the form of the Arithmetic Logic Units (ALU) chips used 74181 and the Register File chip, the 74172 were both now so extinct as to be classified as “unobtainium”. Undeterred I went looking for a source for both anyway. To my surprise I found it wasn’t that hard. Perhaps I got lucky as one of my preferred Electrical Parts re-cycler’s here in Australia miraculously had enough stock of both these chips to commence construction.

So we set about building PISC. The “Pathetic Instruction Set Computer”.

Much more information coming soon. For now however I’ll sign-off with these three links to some Vimeo videos I created showing PISC at various stages.

PISC running it’s first complex program.

PISC board overview

PISC Monitor Program Demo

Bidirectional RF Amplifier

Vk2sja-Photo45

Well I’ve been working my way along the Minima block diagram. Following it up-stream as it were. And so finally arrived at the “Bidirectional RF Amplifier” or Bidi Amp for short. You can see my version above.

First some back-story.

When I first started contemplating building a scratch-built homebrew rig from ground up. I was looking around for ideas and very quickly found Farhan’s BitX-20. I was even thinking about using the Realistic DX-100 case for a BitX project. So I started reading everything I could lay my hands on about the BitX. As it happened while I was researching the BitX project Farhan announced the Minima. So I shifted focus and we now find ourselves here.

However during the process of looking into the BitX I stumbled across a file called:-

“A Termination Insensitive Amplifier for Bidirectional Transceivers”

co-authored by none other than Wes Hayward, W7ZOI and Bob Kopski, K3NHI, from way back in June 2009. The file had been uploaded into the files area of the into the Yahoo BITX20 Group by Farhan himself. So I read it.

It soon became clear that Wes and Bob were offering for consideration what they believed to be a much improved bidirectional amplifier design over that used in the original BitX. It was apparent that Wes and Bob thought the original design less than optimal because the input impedance of that original RF Amp was dependent upon the output termination. I’ll not try explain further here but would encourage anyone building a BitX or Minima to go and have a careful read of this document.

Now I was a bit puzzled as to why this newer RF Amp was missing from current BitX designs. I was reading this in late 2013 some 4 years after the paper was originally written. Perhaps some BitX designs did use the newer design and I managed to miss seeing them? But at the time I concluded that the original design must work well enough. Well enough, that nobody saw any imperative for change. It was also obvious that the newer design used more parts and so would be marginally more expensive. So I mused over this information and decided that if I did go ahead and build a BitX that it would be fun to build it with the newer Bidi RF Amp design.

Then along came the Minima. And guess what? Sitting right at the very heart of the circuit diagram was the very same hitherto missing “Termination Insensitive Amplifier”! Or was it the same? Well No, it wasn’t identical, Farhan had modified it somewhat. But its heritage was clear and Farhan himself cites the Minima amplifier origins on the Minima home page:-

“Bob Kopski and Wes Hayward have produced better feedback amplifiers for BITX a few years ago. This circuit was used as the IF amplifier amplifying the signal towards from the modulator to the crystal filter. It has strong 50 ohms output impedance that drives the crystal filter properly.”

So with all this information rattling around in my otherwise empty head, I made a decision. I decided that I would build my version of the Minima Bidi RF Amp as per the original article by Wes and Bob. I had no specific reason for doing so. I just liked the “symmetry” of the original RF Amp and owing to Wes and Bob’s detailed description of how the circuit operated thought I had a better chance of understanding its operation.

Now on about page 5 of Wes and Bob’s document is a table. This table lists various resistor combinations that can be used for various gain levels while maintaining a 50 Ohm input and output impedance. I knew that the Minima Bidi Amp was supposed to have about 20dB gain. So I selected the option from the table that read:-

R1 Ohms = 330
Rf Ohms = 1000
Rd Ohms = 10
Gain = 19.3dB
Return Loss = 30dB

I selected this option because 19.3dB gain was pretty close to the nominal 20dB. Other builders had been getting about 16 to 18dB in any case. And also because this option had the second from highest return loss figure of 30dB.

So I went ahead and built one.

Vk2sja-Photo46

And there it is connected to my RF power meter. Which is a silly photograph to show you. Because the power meter in the photo is measuring the input RF power level to the Bidi RF Amp at -20dB as adjusted from the signal generator. You’ll just have to take my word for it that when looking at the output it was almost exactly 0dB for +20dB of gain. As tested in both directions. The ‘scope output was a beautiful crisp clean sign wave. In short, mine works exactly as Wes and Bob said it would. I’ll try to take a ‘scope snapshot and upload it here soon.

Did it work first time?

Of course not.

I built the first half of the RF Amp one weekend no problem at all. I was being careful because it was new territory. The next weekend I went and added the second half. I was making haste because I knew exactly what I was doing… Problem. Both sides stopped working properly. Grr! Enact fault-finding mode. I found that in my haste I had installed a 180K Ohm resistor, instead of a 180 Ohm, Oops. And then I found a solder bridge. But still it was not working… Darn!

About 3 hours later I discovered that the 0.5 metre test lead with alligator clips. Which I had added just to provide a convenient ground point for both scope and signal generator was NOT a very good idea! Once the offending lead was removed I then got precisely 19dB of gain @ 20Mhz as measured on the 50 Ohm terminated scope. Not bad for a predicted gain of 19.3dB.

For those interested. The transistors I used happen to be BC547-B’s with a beta of ~230.

So happy with the success of my first Bidi RF Amp build was I, that I immediately went and built another one! Identical to the first. And this time, I took my time.

And it worked. First time! 😉

73, Steve.

Crystal Ladder Filter 20Mhz

Minima_Filter

Well I had a lot of fun building the Minima 20Mhz crystal filter. There is no shortage of good information on the topic of crystal ladder filter construction scattered around the Internet. So I’ll try not to tediously duplicate but rather focus on what I learnt specific to the Minima. For those starting from point zero here is just one link to a document containing a reasonable summary of the current state-of-the-art:-

Crystal characterization and crystal filter design.

The first thing of import I learnt about the Minima filter is that it is a QER filter. QER being short for “Quasi-Equiripple”. The QER filter topology is easily distinguished by the use of the two parallel crystals at either end of the filter. This filter type is attributed to none other than David Gordon-Smith G3UUR. Who also developed what is most likely the most popular method for measurement of crystal motional parameters, the G3UUR shifted frequency method.

What I found out about QER filters is that they are “relatively new”. So there is not a whole lot of information about them around the Net. They are a variant of the Min-Loss Cohn Filter topology which substantially reduces unwanted passband ripple. Which is a very good thing. Min-Loss Cohn is popular for simple QRP designs because it is simple. As all of the capacitors in the network have the same value. The only thing wrong with the Cohn filter is the rather large ripple in the passband. QER maintains the simplicity but substantially removes the ripple.

Vk2sja-Photo39

So I decided that I would use the G3UUR shifted frequency method to characterize my crystals. Which seemed appropriate given that the filter was a QER filter. So step one was to build a G3UUR test oscillator and measure two frequencies per crystal for each crystal in my set of 42. Above you can see the test oscillator and frequency meter in action. It is going to be difficult for some to find a counter that will give 1Hz accuracy at 20Mhz. But I’d suggest that the exercise is still worth-while even if you have to scale back to a 10Hz resolution.

Vk2sja-Photo40

So I sorted and labeled each of my crystals with a number from 1 to 42 and then proceeded to measure them. During the process I found three crystals from this batch that wouldn’t even start in the test oscillator. Not quite sure what would have happened if I had managed to select one of these for inclusion in a filter at random. But I’m thinking only bad things would likely come of it.

What you’re trying to do here is pick a matched set of crystals that oscillate at very nearly the same frequency, or as close as you can get them. The data was all entered into LibreOffice Calc spreadsheet and with a bit of software magic the crystals were all helpfully sorted. Such that picking a group of 8 crystals with the closest possible frequency span could be done at a glance.

If you’re not planning on doing the whole “crystal characterization” filter design thing. Then I’d still recommend that you at least do this step. You could use the Minima BFO as the test oscillator. If nothing else it will remove faulty crystals from the equation and it is much more likely that you will end up with a crystal filter instead of a crystal brick wall.

Vk2sja-Photo41

So I went ahead and built the crystal ladder filter that you can see above with my “matched” crystals. Oddly enough I (foolishly?) chose to build this filter arbitrarily with the 100pF capacitors as specified in the Minima circuit diagram. Partly because I wanted to see what the result would be. But mostly because at that time I was still trying to get my head around the software design process.

Obviously if you have gone to all the trouble of properly characterizing your crystals then the objective would be to feed that data into some design Software. Requesting it to give you a particular desired bandwidth for your new filter based upon the motional parameters you have carefully collected. The software should then tell you (predict) the inter-stage capacitor values (all the same value for QER) and the filters characteristic impedance. All hopefully with a high degree of accuracy. So just grabbing five 100pF capacitors and slapping them in like I did is somewhat missing the point entirely.

Vk2sja-SA-Shot6

So the resulting filter was connected up to the Rigol DSA-815 and a plot emerged. I have to say I was pretty pleased to see this picture. But what’s this, the 3dB BW is only 1.9kHz? Others have been reporting 4.5, 6 and even higher 3dB bandwidths! Which just goes to show that the resulting bandwidth is very dependent upon the actual crystals being used and their motional parameters.

Filter1_20Mhz_1k9BW

The plot above is the same 1.9kHz filter. It was generated with the vna/J software using a MiniVNA-Pro. This plot shows both the S21 transmission loss plot and the S11 refection or return loss plot overlayed. You can see more detail from this instrument as the minimum bandwidth resolution of the Rigol DSA-815 is only 100Hz. But the Rigol is more than up to the task of providing crystal ladder filter sweeps for Amateur purposes. The return loss plot looks pretty messy and not anything like the ones you see in text books. To be honest I don’t really have a good feel for how good or bad this filters return loss is. Time, more reading and some experimentation will reveal all.

Dishal

Along the way I had discovered, to the best of my Internet sleuthing, that there is currently only one software design tool which will allow you to predict and model the QER filter. And that software package is called Dishal.

So I fired up Dishal as seen above and proceeded to try to understand the inner workings and why my filter was so narrow compared to those built by others. I’m going to use Dishal to predict the required capacitor values for a filter 3dB bandwidth of 2.7kHz. Given that I tell Dishal what -my- specific crystal motional parameters are.

I should mention that QER filters with all capacitors being of equal value makes experimenting easy. It wouldn’t be hard to arrive at a desired filter bandwidth simply by logical substitution of the capacitors. Reducing the capacitor value(s) increases bandwidth while increasing capacitor value(s) decreases bandwidth. So with some educated guess-work and only a few wholesale capacitor bank change outs. You should arrive pretty close to where you want to be in terms of bandwidth. Of course you’re not going to know what your filter impedance is until you test/measure it. Which is the other very important thing that your filter design software will tell you. But it can all be done. So even if you don’t have any method of sweeping a filter then you can still build them!

The first thing one needs to get your head around with QER and Dishal is that nearly all of the program functionality displayed above, including the ability the plot pretty filter plots. Is not applicable to QER filters. If you’re using this software to design a QER filter, then you are simply going to use two or three program features available from the drop-down menus at the top of the screen. The option “Xtal”, and then later in the design process the “QER (G3UUR)” option. Likely followed by the “LC-Match” to assist in building a matching network.

Under the “Xtal” option you get two sub-options for the two most popular methods for performing Crystal Characterisation of the motional parameters. The G3UUR method and the 3dB BW method. I used the G3UUR method but later cross checked with the 3dB BW method. I found that either produced results so close that it wouldn’t matter which you use. So the selection of method will be something of personal preference. Perhaps dictated by the test equipment you own. If you’re lucky enough to already own a VNA then the 3dB BW method may well be easier.

QER_Calculator

After some trial and error I discovered that Dishal could be used to accurately predict the capacitors required to build a filter of a given bandwidth. What I found however was that the crystal holder capacitance value was critical. I had to measure the capacitance value between the two crystal leads, record this value. Then I needed to short the two leads together and measure the capacitance between both the shorted leads and the metal case of the actual crystal. The second amount then needed to be deducted from the first and the result is entered into Dishal as the Cp (pF) figure. It was only the difference of a couple of “Puffs” but it made a world of difference to the prediction.

So after carefully collecting the crystal frequencies(s) of all my crystals. Then selecting the 8 crystals closest together in band-spread. Only 65 Hz spread between them. Then measuring the holder capacitance of all these eight crystals. And then averaging all of these eight values to arrive at a single value to enter into Dishal for each parameter. Dishal then proceeded to predict 65pF as being required for a 3dB bandwidth of 2.7kHz with some 94 ohms of in/out impedance. I substituted a standard capacitor value of 68pF and went ahead and built my second filter. I had decided to keep the 1.9kHz 3dB BW filter. After all it was a good looking filter!

And the result?

Filter2_20Mhz_2k7BW

Again the plot above was produced by vna/J and a MiniVNA-Pro. Using the marker math function of vna/J it was revealed that the 3dB bandwith was:-

19,997.524 Low
20,000.175 High

Actual 3dB bandwidth = 2.651 kHz! Not too bad a result for 2.7kHz requested.

A Dishal help file warns that calculations are based on mathematically perfect components. Which of course don’t exist in the real world. The resulting losses mainly in the capacitors leads to a slightly smaller 3dB bandwidth than that calculated. The suggestion is to work out what your desired 6dB BW would be and then enter that as the requested 3dB BW (i.e. lie to the program essentially). This will apparently place you *very* close to your actual desired BW. The fact that I did not do this would go a long way towards explaining my smaller than requested BW.

So I was very happy with the new filters width. But what’s that wavy pattern across the top of the passband? Ripple! Nearly 3dB of it at a quick glance at the plot. Now I asked the question:- “How much ripple is acceptable?” and basically the answer came back:- “How much are you prepared to put up with?”. I even found a commercial manufacturers technical bulletin talking about adjusting a filter matching network which said that anything “less than 3dB” of ripple was to be deemed acceptable. Admittedly this alignment procedure came from the valve era and I think our standards today are a little higher, even for the home-brewer. Suffice to say that 3dB is probably too much and if you have it down to less than 0.5dB ripple then that is considered very good indeed.

So where did the ripple come from? The ripple from a practical stand point is caused by two things. Failure to match your crystal filters input and output impedance properly and how wide your filter is. The wider the filter, the more ripple it is going to have. This means that building an exotic narrow CW filter is actually pretty easy. A 400Hz CW filter using the traditional Cohn topology is probably not going to have any significant passband ripple. But if you try to build a filter with wider SSB bandwidths, like the 2.7kHz 3dB BW filter above, then keeping the ripple under control gets harder, much harder.

It also goes to show how lucky I was with the first filter I’d built. The bandwidth may have been an unexpectedly narrow 1.9kHz but the combination of narrow BW and what must have been a filter with very, VERY close to 50 ohms input and output impedance resulted in a very flat passband.

What to do to reduce the ripple? I needed to impedance match the input and output of my new 2.7kHz filter to 50 ohms.

Vk2sja-Photo42

Now Dishal had predicted about 94 ohms impedance in/out. So I guess I could have just matched to that. But I had altered the capacitor values slightly. By now I had learnt that sometimes very small values of capacitance make big differences. I guess I could have used Dishal, and altered the requested bandwidth to arrive at the actual value of capacitance I had used and then read off the predicted Zo in/out. But I wasn’t sure if this approach was valid. So in the end I went and built a couple of in-line resistive terminators.

Vk2sja-Photo44

You place these either side of the filter. Then adjust the mutli-turn pots for best passband response while looking at the spectrum analyzer filter sweep in real time. The resistive terminations cause bucket loads of additional insertion loss but you don’t worry about that. This adjustment is subjective and a bit tricky. As I had to keep adjusting the DSA-815 settings to keep the top of the passband visible. Adjusting the resistors tended to make important parts of the trace disappear off the bottom of the analyzer screen. Eventually I arrived at what I thought looked like the flattest passband response. And when the terminators were removed and the actual resistance checked with an Ohm meter I was pretty close to 75 ohms.

So I then asked the Dishal LC-Match to give me the values for a L-Pad to match 75 ohms to 50 ohms. Which gave series inductance of 0.28uH with parallel capacitance of 75pF. I substituted 75pF for a standard value of 82pF and with a bit of help from the AADE LC meter (fantastic tool this!) built some 0.28uH air-core coils and the result looked something like this:-

Vk2sja-Photo43

And the actual filter response now looked like this:-

Filter2_20Mhz_2k7BW_matched

Filter2_20Mhz_2k7BW_matched_closeup

~ 0.5dB passband ripple!

As Colonel Hannibal from the “A-Team” would say:- “You gotta love it when a plan comes together!”

73, Steve.

More on FET Matching

Vk2sja-Photo38

Well as promised here is a quick run down on my journey through the FET matching process. Pictured here is my latest mixer and above it are three different little test jigs that I built to help match and measure FET characteristics. From left to right we have a FET Voltage at Pinchoff (VP) test tool, a FET matching bridge and at far right a very simple jig for measuring FET IDSS. It simply shorts the Gate and Source together.

All of the information for building these devices started at the web site of QRP Homebuilder. Sadly in recent days this outstanding treasure trove of electronic goodness has been pulled from the Internet. Thankfully Todd Gale, VE7BPO the owner and creator of QRP Homebuilder has archived the entire site and made it available as a single (large) PDF document. See here for details.

I found measuring IDSS is a pain because as the current flows heat is caused and circuit conditions change. This in turn causes the meter readings to change before your very eyes as you watch it. I’ve read that manufacturers actually pulse DC current into the FET to stop this from happening when they test for IDSS. I have mentioned in a previous post that I settled for simply switching the current flow on. Waiting a set number of seconds (10 in my case, the same number for each test) for things to settle down a bit and then simply recorded the number displayed on the volt meter at that point in time.

The FET matching bridge is very precise. It tells you when two FET’s are exactly the same. Which is pretty much what you want for a FET mixer of any type, be it Passive, Active or whatever. But this does not tell you what the pinch-off voltage is (VP). Which could be very important if your trying to exceede VP deliberately for the purpose of creating a switching or “chopper” mixer. The Minima mixer is supposed to be a mixer of this type. Equally, if you wanted to build a mixer that remains in the non-linear square-law region. Then the reverse would become important. You would want to make sure your mixer was NOT exceeding VP.

So that’s what the most complicated test jig pictured above is for. The FET Voltage at Pinchoff (VP) test tool. This tool allows you to adjust the FET bias such that you just hit pinch-off (VP) when your digital volt meter reads zero volts across a resistor. Once this is done you then connect your volt meter across another set of test points in the circuit to read off the actual pinch off voltage (VP).

Again all of the knowledge I gathered together to build and use these tools came straight from the QRP Homebuilder web site. Which is now archived into a PDF linked above.

One final comment.

What I found (like Professor Vasily Ivanenko before me) was that if two FET’s have matching IDSS values then the VP of those same two FET’s would be very close indeed. So I think for all practical purposes that Amateurs can match FET’s for use in mixers by simply using the most simplest of the test jigs above. The IDSS test tool. So simple in fact, it does not really need a jig at all. It is only a time saving convienience if you plan on testing multiple FET’s in the one session.

So this then will get you a “matched” set of FET’s. Having got that far then all you the need to make sure that your mixer circuit is well and truely exceeding VP, or not. Depending on the mixer type your trying to build. For the Minima it is supposed to be a switching or “chopper” mixer. As such VP needs to be exceeded. I checked mine and it was. But there is some general concern about that the original Minima mixer design may not be able to deliver sufficient voltage swing to drive the J310 FET’s into cut-off. This does not mean that the mixer would not function. In fact it may even mix quite well. But it would not be operating as a high performance commutating (switching) mixer. Which has implications for the rest of the circuit as a whole.

Next up, some crystal filters…

73, Steve

Mixer Melodies. KISS, KISS V2 and Double-KISS

Vk2sja-Photo35

Well its been a while between posts. I got tied up experimenting with Mixers for longer than expected. Here you can see a collection of the various mixers I’ve built over the last few weeks. A Passive Quad J-FET Mixer, Two versions of the J-FET KISS mixer and a couple HC4066 CMOS switching mixers. Many of these went through two or three re-builds while playing around with various configurations.

So why all the different mixers?

Well the story goes something like this…

KISS_V2

Early in the life of Minima some builders started reporting high levels of local oscillator leakage to the RF port in TX mode. You can see this at the 34Mhz point in the spectrum analyser screen shots above. The solution? Farhan then offered the KISS V2 circuit for testing. This circuit gave extremely good adjustable LO suppression but some experimenters, including myself, started seeing higher levels of insertion loss with this mixer. The original KISS mixer had about 7dB insertion loss while the newer KISS V2 was being reported at 10dB+. The first version of KISS V2 I built was up around 14dB. By the third re-build I did get it down to 10dB but couldn’t manage to get it any lower than this.

To me the large local oscillator (LO) leak seems inherent in the design of KISS V1 and other variant mixers based on this pattern. If you look at the circuit schematic you can see that the LO (if nicely formed) will be of equal but opposite magnitude in each side of the input into the mixing transformer. As such these signals should cancel out very nicely at the mixing transformer centre tap. However not so much attenuation is available to the other winding of this transformer. Both the DSA-815 screen shots above are looking at the output from the port on the second mixing transformer winding, not the centre tap port. Hence the high LO level at 34Mhz.

Vk2sja-KISSv3

In all this experimenting I did a lot of Googling slash reading and came across this paper:-

RF Mixer Design

On page 16 I found “Figure 28: Circuit diagram of a FET based switching mixer”

So on a whim I decided to blend this design with the alternate bias method that Joe outlined. This modified circuit can be seen left. I’m now somewhat presumptuously calling this J-KISS version 3. Because that’s easier than typing “Modified version 1 Minima J-KISS mixer with Joe’s floating bias modification and a couple of extra resistors that I added just to see what would happen…”, all the time.

Vk2sja-Photo36

Well it turned out that it worked rather well. In fact for me it worked better and more consistently than any other version that I tried building. Joe’s floating bias had pretty good conversion loss already but adding the resistors dropped the unwanted local oscillator noise almost into the noise floor.

Vk2sja-SA-Shot3

So here is a couple of screen shots of KISS V3 in action. To the left is the mixer in the transmit direction. While on the right is the same mixer running in the receive direction. Note that this clearly shows the difference in the LO leak level depending in direction of signal flow (which port you’re looking at). Which is high here in the receive direction. This characteristic was true of all the J-KISS mixer variants I built.

Vk2sja-SA-Shot4

A couple of important things we should note about this high LO leak level. First, in the original Minima circuit the mixer was connected the other way around. So this higher LO level would be present during transmit and flow through to the the low pass filters. Simply reversing the direction of signal flow through the mixer as done here with J-KISS V3 (and as Farhan intended for J-KISS V2) will now present this higher level to the crystal filter instead. The idea being the the crystal filter will do a better job of filtering it out than the low pass filter. Will this cause any receiver issues? I don’t know yet but at least the transmitted signal should now hopefully be clean and within legal limits for harmonics.

The second important thing of note is that in those J-KISS mixer variants with some sort of manual bias adjustment. Which include both of Farhan’s J-KISS V1 and V2 designs (although the bias arrangement is very different in each). The adjustment will make a significant change to the LO leak level but only on the port connected to the centre tap of the mixing transformer. On the port connected to the second winding I hardly noticed any change at all. Just a few dB at most.

Now my J-KISS V3 mixer was looking pretty good. And while performance is nothing to get too excited about. Let’s face it, a cheap Mini-circuits SBL-1 double balanced diode mixer module would probably run rings around it. But at least my mixer was behaving like a proper mixer should and I can say I built it myself! Oh, and it’s also operating as a switching mixer or “chopper” which is important in the Minima. This version was in some ways the easiest to build and get going because it has no bias adjustment. But herein lies the catch…

Vk2sja-SA-Shot5

For this mixer to work well the J310 FET’s must be very well matched prior to building the unit. So what happens if you don’t? The spectrum analyser screen shot to the left shows exactly the same mixer used above but with a pair of deliberately mismatched J310’s installed. We can see that all the unwanted signal levels jump upwards. The dreaded LO leak level alarmingly so. Interestingly the conversion loss seemed to remain largely unaffected. Compare this screen shot with the one two above.

So building this mixer means that you must match your FET’s. Personally having now been through the FET matching exercise I don’t find the task too onerous. No more difficult than matching the diodes we typically use in other mixers. A procedure which we Radio Amateurs take for granted. And probably a lot easier than profiling/matching crystals for ladder filters.

It occurs to me that the FET matching process only really requires an accurate digital multimeter. While the adjustment of a mixer balancing pot ideally needs a Spectrum Analyser. Admittedly you could probably make do with a general coverage receiver listening to the LO frequency via a direct cable connect to the mixer with some in-line attenuation. The multimeter seems the somewhat simpler though. Anyway it could be that for the average home builder pre-matching the FET’s used to build a mixer may be in fact be easier than adjusting a balance control setting after the mixer is built. Perhaps, maybe…

Vk2sja-Photo37

So finally I tired of playing with mixers. There is much, much more that I have not tried and should have. Looking back there are experiments which need to be re-done because of flaws in my methodology or understanding at that time. Please understand that what I present here are just my experiences. While I stumble around learning new skills. This is what happened to me. With the mixers that “I” built! I’m no Electrical Engineer or RF Design Engineer. Just a hobbyist Amateur Radio enthusiast. So your mileage, as they say, may vary – significantly! But if this project was ever going to reach an operational state. Then progress had to be made at some point. At a later date since this build is a modular scratch build with no PCB to lock me into a particular design. It will be easy enough to swap out the mixer module with an improved version.

So enough was enough and I installed my modified J-KISS in the radio. As seen here from the underside. No connection to either the IF or RF ports as yet. The coaxial cable from the LO port can just be seen sneaking its way out and immediately up to the Si570/logic PCB topside.

Double_KISS

On a final note this section would not be complete without mention of the “Double KISS”. Farhan released this circuit to the Minima group for experimentation. Called the “Double-KISS”, no doubt because it is doubly balanced instead of singly balanced like the original Minima JFET KISS… I think? This mixer uses a modern high speed CMOS bus switch at its heart. Which brings it much closer to the original KISS design detailed in the “Mixer Musings and the KISS Mixer” paper by Chris Trask/N7ZWY. Which is where all this mixing business started in the first place.

So a lot of experimental energy is now being invested in this direction. This style mixer promises exceptional performance. The only downside being the somewhat exotic part required. They are not particularly expensive, just not available from your local electronics store. So the Minima continues to evolve as time goes by. For myself I have ordered some suitable high-speed CMOS bus switches for experimentation but at this stage plan on completing the radio close to the original design. I can then evaluate its performance before making any changes like a mixer substitution.

Well that’s all for the moment. Next up I’ll back-track a little and talk about JFET matching in more detail. Then we shall tackle the 20Mhz Crystal Ladder Filter.

73, Steve. VK2SJA

Vale QRP Homebuilder – Viva QRP Homebuilder!

QRP_Homebuilder_Logo

With some sadness I must report that as of October 5th 2014 the QRP Homebuilder web site of Todd Gale, VE7BPO is no longer with us.

QRP Homebuilder was one of the truely great Internet resources for the electronics enthusiast. A collection of homebrew experiments explained in simple, clear, practical terms with working examples. Intermixed with some truely outstanding graphics and images, all of which made the QRP Homebuilder web site an absolute standout.

After the loss of a lengthy and protracted battle with an Internet Service Provider (ISP) over maintaining suitable levels of service bandwidth for the site. Todd made the difficult decision to pull the site entirely. Rather than have it limp along in lame duck fashion.

The good news is that there is a silver lining to this dark grey cloud. And not all has been lost to the great “Bit-Bucket” in the virtual sky.

Todd is launching a new Blog which will be available here:-

QRP Popcorn Blog

Todd has also graciously archived just about the entire content from the original QRP Homebuilder web site into one single large (~40Mb) PDF file. Which will be made available for download from several Amateur Radio blog sites. Including this one! And so with Todd’s permission I am very, very pleased to be able to offer the following download link:-

QRP Homebuilder PDF Archive File (~40Mb)

Viva QRP Homebuilder and thanks Todd!

73, Steve
VK2SJA

The_Doctors2

Matching J310’s and Testing a KISS Mixer

Vk2sja-Photo32

Eventually a bunch of J310’s that I ordered arrived. So I proceeded to pull out 10 units at random to match.

I built another tiny little test board to measure IDSS. The circuit is so ridiculously simple that it was hardly worth the effort of building a board. It only grounds the gate to the source. You measure the current flowing into the drain. But it was handy because of the test socket. It made testing a whole group reasonably quick.

I found measuring IDSS this way on a J310 to be a moving target. The current would continue to fall off the longer I let it flow. Internal JFET heating I assume. I got sick of waiting for it to stabilise by about the 30 second mark. So in the end I plugged them in, counted to 10 seconds and then recorded the value shown on the DMM at that time. Not an exacting science but I was only interested in the relative IDSS value between FET’s.

I also matched each of the J310’s to the transistor I had designated unit #1. I found that two transistors with a very similar IDSS would also present very good balance in the bridge. Somewhat predictable I know. But always nice to have something you only suspect as being true proved by experimental method.

In the end I selected two FET’s with not quite the highest value of IDSS because they were better matched in the bridge. This matched pair recorded only 0.002v using the bridge as the picture above shows. Sorry about the quality of these images. They are a bit dark. More lighting practice required.

Vk2sja-Photo33

So here is my version of the KISS mixer. Above is the Minima KISS Mixer as per Farhan’s original circuit. I used FT37-50 toroids instead of FT37-43’s because I didn’t have any of the smaller ones on hand. I used thicker wire 0.5mm to match. Apart from that and my unusual choice of RF connector it is built as per the original.

This unit has the adjustable 0-5v DC bias which is why the power leads are connected. On my version of the KISS mixer I found that the bias adjustment seemed to have very little effect on the mixer output levels. It had some, just not a significant amount. LO leakage only varied by about 1dB and the wanted RF product by only 0.5dB over the entire bias range. One of my next experiments is to see if the adjustment range actually increases if your FET’s are poorly matched.

Vk2sja-Photo34

This next picture is a modified version of the KISS mixer. Very early on in the life of the Minima Freelists mailing group Joe W3JDR suggested an alternate bias method. This method does not require the 5 volt bias regulator. It directly grounds both FET sources and connects the centre tap of the LO Gate transformer not directly to ground but instead floats that point by connection to ground via a parallel 200K Ohm resistor and a 0.1uF capacitor. You can read Joe’s original post about it here.

Vk2sja-Circuit3

Vk2sja-Circuit4

So do they work? Yes, I’m very pleased to say. They both do.

So what did each version perform like?

See for yourself.

These Spectrum Analyser screen shots were taken with the LO from the actual Si570 at +14dBm and the 20Mhz IF at -10dBm into the mixer. The Rigol DSA-815 is looking at the RF port (simulated TX mode).

Vk2sja-SA-Shot1

Above is the output from the original Minima mixer.

Vk2sja-SA-Shot2

While this last image is the output from the modified mixer.

Next up. The Minima Low Pass Filters and some more mixer testing…

73, Steve. VK2SJA